A Fly to Tie and Try this month – July 2022 by Les Lockey
Fly of the Month by Les Lockey for July 2022
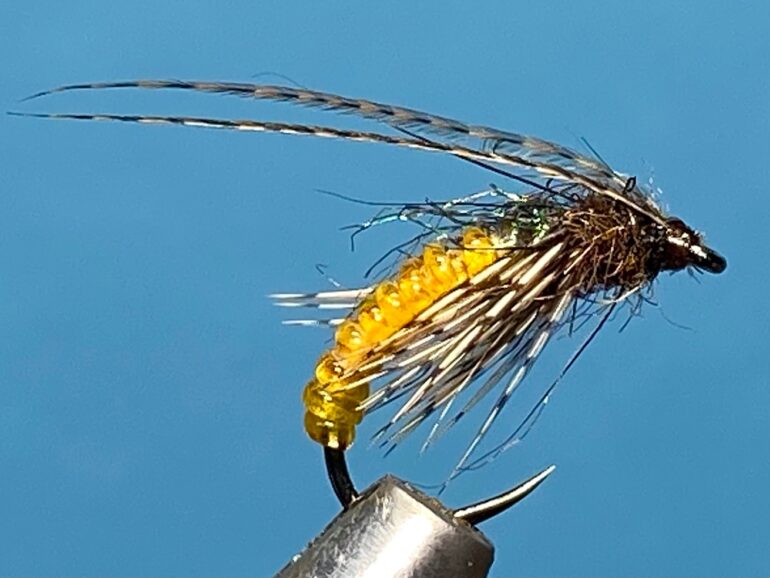
The Elastic Caddis Pupa
Hook: Fulling Mill Czech Nymph, sizes 14 and 16.
Underbody: Fine copper wire.
Thread: Lt. Cahill Uni 8/0 for the abdomen and dark brown UNI 8/0 for the thorax.
Abdomen: Strong and Stretchy elastic jewellery cord, Amber.
Pre -Thorax: Peacock Ice Dub.
Legs: Brown partridge feather fibres.
Thorax: Dark brown SLF Squirrel Dub.
Horns: 2 Bronze mallard fibres.
Photo 1. Firmly secure the hook in the vice and starting opposite the hook point, wind on a bed of copper wire to part way round the bend and break off the excess wire. Form a tapered wire underbody by winding on 3 or 4 layers of copper wire, each layer being slightly shorter than the one before and when complete, break off the wire at the start point. To avoid any slippage, lightly coat the wire underbody with superglue and allow to dry thoroughly before continuing.
Photo 2. Catch on the Lt. Cahill thread in front of the wire and keeping the tag end tight, wind the thread over the wire and then remove the waste thread. Continue to make a few more thread turns after the end of the wire and then return the thread to the thorax covering as much of the copper wire as possible.
Photo 3. Take a 4 inch length of elastic cord and cut one end to a shallow angled point. Using well waxed thread, securely tie down the point in front of the copper wire and once secure, stretch the cord rearwards and bind it down with tight thread turns, then return the thread to the thorax.
Photo 4. Keeping the elastic cord under tension, wind it tightly up the shank and tie it down securely at the thorax with well waxed thread. Cut off the excess cord at a shallow angle and tidy the area with thread.
Photo 5. Dub a small pinch of Ice Dub onto the thread and wind on the dubbing as a pre-thorax, over and in front of the last turn of cord. Attach the brown thread at the eye and use it to secure the yellow thread. Remove the yellow thread and the brown thread tag and tidy the area with brown thread.
Photo 6. Cut out the tip of a brown partridge feather to form a V shape. Remove all the basal fibres from the stem leaving about 10 fibres on each side of the stem. Angle the V down either side of the shank so the fibres sit equally along each side of the abdomen and are about the same length as the hook, then secure the feather in position with a few thread turns and remove the waste feather, leaving he thread at the head.
Photo 7. Dub some SLF squirrel dub onto the thread and wind on a tapered thorax, returning the thread to the eye. Use Velcro to lightly brush out some fibres from the sides of the thorax, taking care not to catch the tying thread, then with your fingers, massage the fibres rearwards ensuring any fibres pointing forward of the eye are stroked back and held in position with a few turns of thread.
Photo 8. Align the tips of 2 bronze mallard fibres and tie them in pointing rearward and about twice the length of the hook, then remove the waste ends.
Photo 9. Form a neat head, whip finish, remove thread and varnish the head to complete the fly.
Tying Tips
- Make sure the hook is securely clamped in the vice as it needs to withstand considerable pressure when the elastic cord is stretched.
- To help control the copper wire when winding the underbody, I put the bobbin of copper wire into an old ceramic bobbin holder. For a heavier fly, use thin strips of self- adhesive lead sheet to build the underbody.
- Don’t get too hung up about the neatness of the underbody as the thread and elastic cord will mask any minor imperfections.
- It is a good idea to tie the wire underbodies in batches to give the superglue plenty time to dry thoroughly.
- Strong and Stretchy jewellery cord comes in a variety of colours and 3 different thicknesses – 0.8 is the most useful size for fly tying, but the thinner 0.5 version is good for buzzer bodies so it might be worth buying both sizes. A pack of 8 spools of different colours can be bought very cheaply from eBay.
- The original pattern used yellow jewellery cord, but I find the amber colour works best for me. Green is another good colour to try.
- Fine vinyl D rib from Veniards is perhaps the best alternative to the jewellery cord, but it is much less stretchy and as a result, creates a rather thick body, although soaking the vinyl rib in hot water will improve its stretchability a little.
- An alternative method for tying the legs is to tie in the partridge hackle by its tip and wind on a few turns of hackle in the usual way, and when secure, cut off the top and bottom fibres.
- I find it is easier to create a tapered thorax by winding the dubbing from the hook eye rearwards and then back towards the eye. This helps to avoid the dubbing slipping forward over the eye while maintaining the desired tapered shape.
- For security and neatness, when tying in the horns, fold the stub ends back and tie them down with thread before cutting off the waste ends.
Fishing notes
- Caddis flies, also known as sedge flies, are part of a large family of insects called Tricoptera, (hairy wings in ancient Greek) with over 14,500 species world – wide, and over 200 here in the UK, although relatively few of these are of interest to fly anglers. At rest, their wings are folded in a roof or tent shape and as such, they are sometimes confused with moths (whose wings are actually covered in scales, not hairs), but more commonly with Alder flies, which apart from being present much earlier in the season than most sedge species, they also have heavily veined and semi – transparent wings. Interestingly, fly anglers in the UK tend to refer to the larval and pupal stages as caddis patterns and their dry fly equivalents as sedges, but the terms are interchangeable.
- Caddis flies range in size from tiny micro sedges measuring about 4mm. in length to the Great Red Sedge at over an inch long. Most species are very small and essentially nocturnal by nature, although pupae can start to hatch from mid – afternoon onwards and usually close to bankside vegetation such as reeds and lilies.
- On calm summer evenings, caddis hatches tend to start slowly with the trout easily intercepting the odd early ascending pupae and showing little or no obvious signs at the surface, so it is always worth fishing a caddis pupa imitation from late afternoon onwards. As the hatch develops and the pupae begin to quickly ascend the water column in much greater numbers, fish will be seen bulging just below the surface and often at significant speed. Casting the fly beyond the activity and retrieving with long pulls or a fast figure of eight will often result in an aggressive take, so it’s worth upping the breaking strain of your tippet and paying special attention to your knots. Unfortunately for anglers, this intense pupal feeding activity is invariably short lived, so it is worth having a spare rod set up with your favourite caddis pupal imitations to make the most of this situation.
- To avoid snagging, I tend to fish this caddis pupa as a single fly on a floating line with a 12 – 14ft. tapered leader and allow plenty of time for the fly time to sink before retrieving in a steady sink and draw manner.
- Another option is to fish an imitative washing line with two pupal patterns on the droppers and either a bushy CDC dry adult sedge or a G&H deer hair sedge on the point. However, when time is limited and the light is fading, I find using just two flies is the best approach. With the pupa on the point and a bushy CDC dry sedge on the dropper, this setup allows me to skate the dry over the surface while at the same time, pulling the pupa up towards the surface.
- Summer mornings can also provide excellent dry fly sport if conditions have remained still overnight, as casualties and egg laying females remain stuck in the surface from the previous night’s action.


Recent Comments