A Fly to Tie and Try for August by Les Lockey
Fly of the Month- Aug
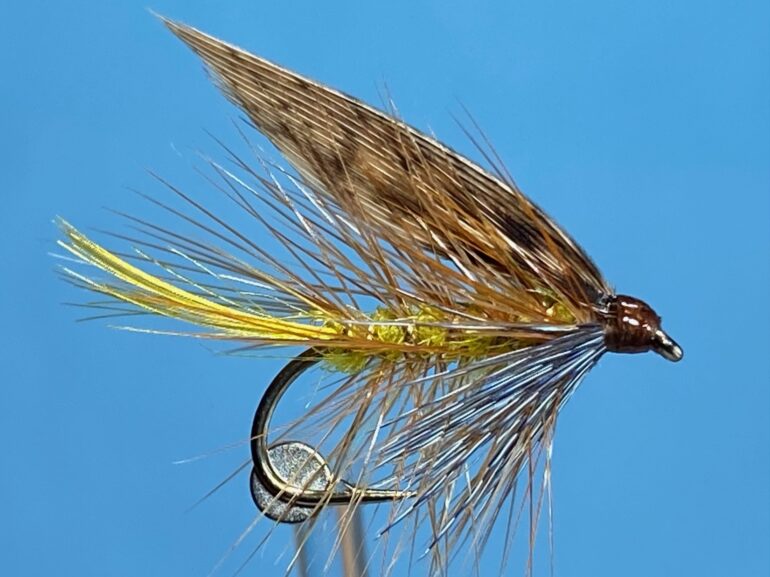
The Invicta – (James Ogden)
Hook: Kamasan B170 or B175, wet fly hook, sizes 10 – 14.
Thread: Veevus GSP, 50D, in black or brown, or any black or brown thread.
Tail: Golden pheasant crest feather.
Rib: Fine oval gold tinsel, or gold wire for smaller hook sizes.
Body: Yellow seal’s fur.
Hackle: Furnace or Red Game cock hackle.
Throat hackle: Blue Jay fibres.
Wing: Hen pheasant centre tail fibres.
TYING
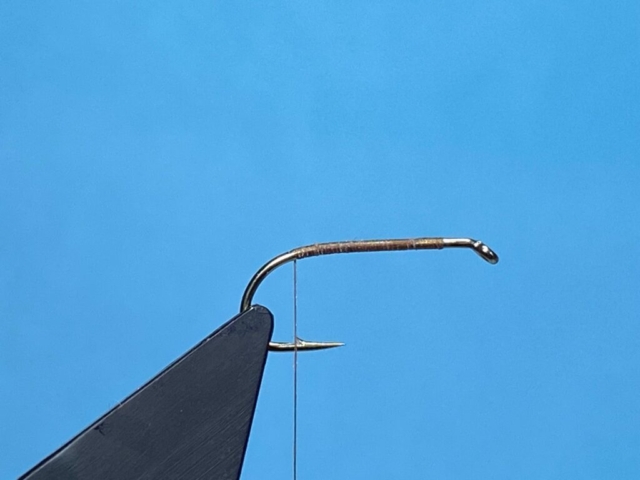
Photo 1. With the hook secured in the vice, start the thread a couple of millimeters from the eye and wind on a bed of thread to a point opposite the barb and remove the thread tag.
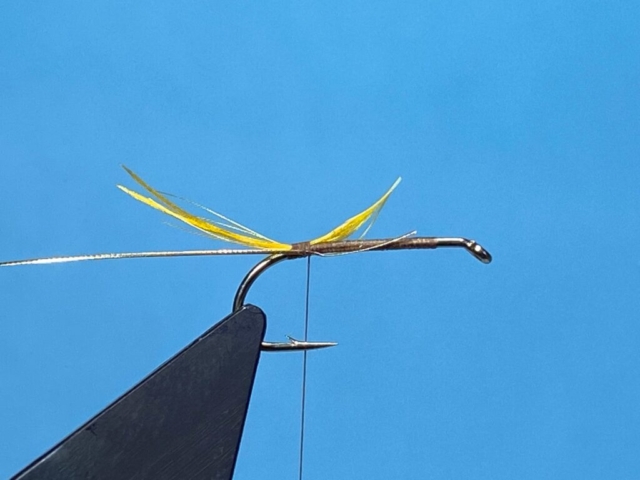
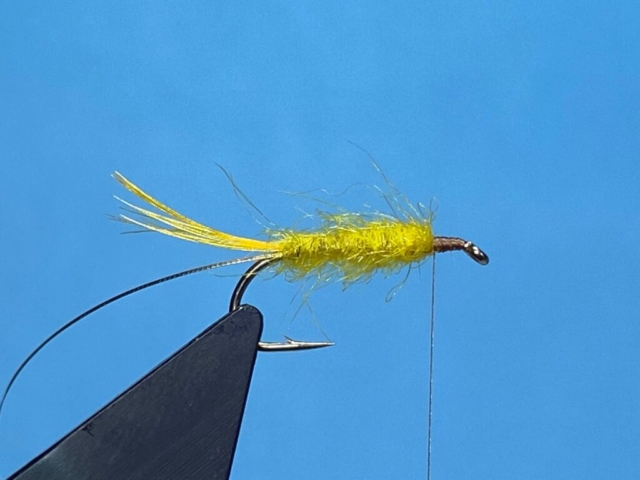
Photo 2. Using just a couple of thread turns, tie in the golden pheasant crest feather on top of the hook shank as a tail, approximately equal in length to the body of the fly, then trim off the excess feather the same length as the body. In similar fashion, tie in the oval tinsel rib.
Photo 3. Bind down both materials to the end of the body and return the thread to the tail.
Photo 4. Dub some seal’s fur onto the thread and wind the dubbing noodle up the shank to form a tapered body.
Photo 5. Remove the fluffy fibres from the base of the cock hackle and trim the stalk to about 2mm. in length. Secure the feather by the short stalk using a few tight turns of waxed thread.
Photo 6. Wind on two close turns of hackle at the head and continue to palmer the hackle in open turns down the body to the tail. Trap the hackle with the oval tinsel and continue to wind the tinsel in open turns through the hackle to the end of the body. Secure the tinsel with a few turns of thread and remove the excess tinsel. Tidy the area with thread ready for the throat hackle and trim off the hackle tip at the tail.
Photo 7. Align the tips of a small bunch of blue jay fibres and remove them from the feather stem. Position the bunch of fibres beneath the shank with the fibre tips reaching the hook point and tie them in place with a couple of turns of waxed thread. Carefully manipulate the fibres with your thumb nail to form an evenly distributed throat or beard hackle, then secure in place with several more turns of thread, before carefully cutting off the waste butt ends. Tidy the area with thread ready for the wing.
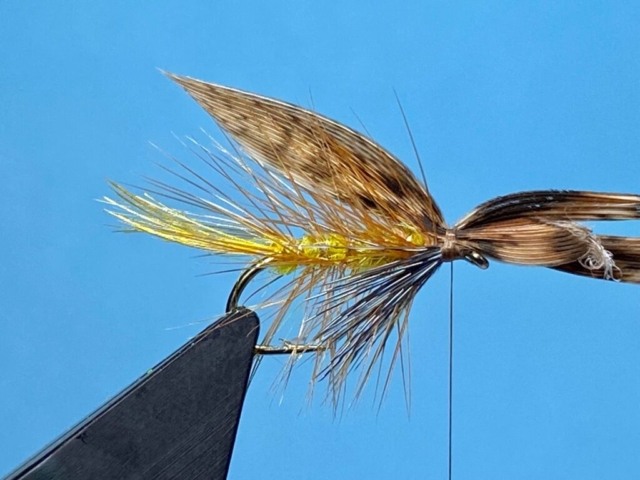
Photo 8. Select two feather slips of equal widths from opposite sides of a hen pheasant centre tail feather. Place the slips together with the good sides facing out and align the feather tips. Position the pair of slips on top of the shank with the tips extending to about the tip of the tail and carefully tie them in using a couple of pinch and loop thread turns.
Photo 9. Check the wing is sitting correctly and then with well waxed thread, secure the wing in position with several more turns of thread. Hold the wing to avoid it twisting and then cut off the excess wing fibres. Bring the thread to the hook eye, and winding rearward, bind down the cut ends of the wing forming a neat head as you go.
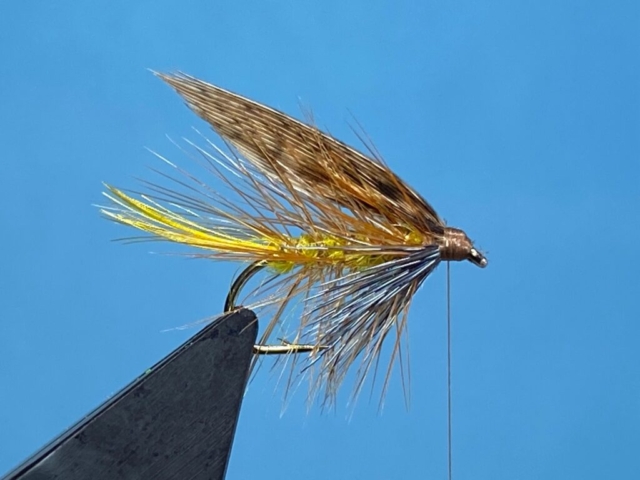
Photo 10. Whip finish, remove the thread, and varnish the head to complete the fly.
Tying tips
- In this pattern, yellow seal’s fur is used for the body, hen pheasant centre tail fibres for the wing and blue jay fibres for the throat hackle, making it a good test of your fly tying skills, but yellow wool, hen pheasant wing quills and blue guinea fowl feather fibres are commonly used as much easier and cheaper alternatives.
- The thread colour for this pattern should be black, but I like to use a mid-brown coloured thread which I feel blends better with the overall tonal range of the fly.
- Whenever possible, try to select a nicely curved golden pheasant crest feather for the tail, as this creates a much more balanced fly. You can create a nice curve in these feathers by soaking the feathers in boiling water, then remove them with a pair of tweezers and mould them around a smooth, cold, curved surface such as the neck of a bottle, metal tube etc. and when dry, the feathers will have taken on the curve of their substrate.
- When tying in the oval tinsel rib, always make the first securing thread turn towards the eye and away from the tail. This helps to avoid the tinsel from disturbing the set of the tail particularly at the point where the rib is used to trap the palmered body hackle.
- For the beard or throat hackle, use a well-marked blue jay feather, ensuring the fibres are long enough to reach the hook point. Once a suitable feather has been selected, align the tips of a bunch of fibres, and while holding the aligned fibre tips, pull them off the stem. The fibres can then be positioned under the shank and tied in using an upward pinch and loop, or alternatively, the hook can be inverted and the fibres tied down in the usual manner. I make a couple of locating thread turns to hold the fibres in position and then gently spread the fibres around the underside of the shank with my thumb nail, before securing in place with tighter turns of thread and trimming off the waste ends. It is important to then form a stable and smooth thread base on which to tie the wing.
- Hen pheasant centre tail wing slips are used for the wing in this pattern, but these are notoriously difficult to work with, which is why most tiers use hen pheasant wing quills as a much simpler alternative. There are two main problems with hen pheasant tail fibres – firstly, the taper of the majority of the fibres is invariable far too long, and secondly, the individual fibres are quite coarse and don’t hold together well. That said, if you can get fresh hen pheasant centre tail feathers, and only take wing slips from the bottom inch or so at the base of the feather, this should help mitigate these problems.
- The method I use to tie the wing starts by separating wing slips of equal width on each side of the feather stem and then pulling them off the stem. This also pulls off a small part of the stem which helps to keep the fibres together and allows the slips to be manipulated without the fibres separating. The wing slips are then placed together back to back, ensuring they are equal in width and the tips are aligned. I then gauge the paired wing slips for length and hold them tightly in position with the bottom of the slips on top of the shank, and using the pinch and loop method, I carefully take the thread up the side of the wing and pinch it between my left thumb and the hook shank, then I loop the thread over the wing and pinch it again between my fore finger and hook shank on the other side of the hook, forming a thread loop over the wing slips and pinched between finger and thumb. The thread is then slowly and carefully pulled straight down under even tension while the wing slips remain tightly held between finger and thumb. This process is repeated twice more before releasing my grip on the wing slips to assess the wing. Assuming wing length and orientation is ok, I take hold of the wing and make a couple more turns of thread towards the eye to secure the wing in position and while still holding the wing between finger and thumb, I cut off the waste wing fibres. This supports the wing and stops it from twisting when being cut. Once trimmed, the thread is taken to the eye and wound back into the cut fibre ends forming a nice head in the process, but it is important not to wind the thread past the point where the first pinch and loop was made, as this will distort the wing.
Fishing notes
- This is truly a classic traditional wet fly dating back to around 1850, but don’t let that put you off. It has withstood the test of time for a very good reason – it works, and not just as a caddis or sedge imitation. Rather surprisingly, the Invicta and its silver bodied cousin also work really well when fish are taking pin fry.
- I fish the pattern anytime from June to September, and always on the top dropper, using either a floating or sink tip line, invariably with a sedge pupa or small damsel nymph on the point, but it can also work well on the point or top dropper when fishing a team of wet flies.
- When fished as a caddis imitation, it often works best in the early evening before a caddis hatch becomes visible at the surface. In this case I like to fish a weighted sedge pupa on the point with the Invicta on the dropper.






Recent Comments