A Fly to Tie and Try August by Les Lockey
Fly of the Month – August by Les Lockey
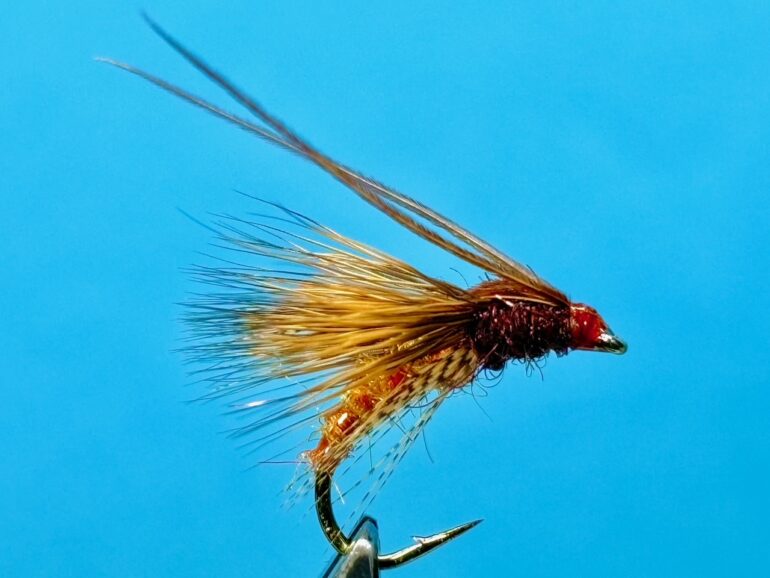
The Cinnamon and Brown Emerging Caddis
(D. Wotton) Variant.
Hook: Kamasan B100, size 12, or similar.
Thread: UNI 8/0 in rusty brown or orange.
Rib: UNI Mylar, clear, size 14, or clear nymph wrap, coloured orange with permanent marker pen.
Abdomen: Cinnamon & fiery yellow SLF, mixed.
Thorax cover: Cock pheasant centre tail fibres.
Wing: Brown deer body hair.
Legs: Summer duck fibres.
Thorax: Dark brown seal’s fur and claret Lite Brite, mixed.
Horns: 2 Cock pheasant centre tail fibres.
TYING
Photo 1. Start the thread a head length back from the hook eye and wind on a bed of thread stopping at the hook point then remove the waste thread. Catch in a length of clear Mylar and bind it down with touching turns of thread to part way round the bend.
Photo 2. Dub the mixed SLF onto the thread and wind the dubbing up the shank to a point opposite the hook point, forming a carrot shaped tapered abdomen as you go.
Photo 3. Colour the underside of the Mylar rib with an orange permanent marker then wind the Mylar over the abdomen in tight open spirals as a rib. Secure with thread and remove the excess Mylar.
Photo 4. Select a bunch of cock pheasant tail fibres for the thorax cover and remove them from the feather stem. Trim off the fine tips with a neat straight cut and tie the fibres in squarely on top of the hook shank ensuring the fibres are well spread and with enough space left for the head of the fly. Tidy the area with more turns of thread leaving the thread at the base of the thorax cover.
Photo 5. Cut a bunch of deer hair from the pelt, remove the underfur and stack the bunch in a hair stacker to align the tips. Remove the stacked bunch of hair from the stacker and gauge for length so that the tips of the hair extends from the thorax area to about level with the hook bend. Cut off the butt ends to the desired length and while holding the bunch of hair tightly on top of the hook, tie down the butt ends. This is best done by using light thread wraps winding towards the eye then tightening the wraps when winding the thread back to the tie in point. Tidy the area with thread creating a taper towards the eye.
Photo 6. Take a Summer Duck feather and snip out a section of feather to form a V with enough fibres on either side to form the legs. Adjust the V so the fibre tips are equal in length, then position the V centrally in front of the deer hair with the fibres pointing back and slightly down on either side of the shank. Secure in position with a few tight turns of thread and snip off the excess feather. Tidy the area with a few more turns of thread, leaving the thread at the eye.
Photo 7. Dub the seal’s fur mix on to the thread and winding rearward, wind on a tapered thorax. Make a few turns of thread back through the dubbed thorax for security and leave the thread at the eye.
Photo 8. Lift the thorax cover straight up and pull it through the centre of the deer hair while at the same time, stroking back the fibres to create a split wing. Tie down the thorax cover securely at the eye and remove the waste pheasant tail fibres then tidy the area with thread.
Photo 9. Align the tips of 2 cock pheasant centre tail fibres and tie them in at the head pointing rearward and about twice the length of the hook. Fold the butt ends back and tie them down with thread forming a neat head as you go. Hold the thread tight and pull off the excess feather fibres.
Photo 10. Whip finish, remove the thread, and varnish the head to complete the fly. If required, brush out some of the fibres in the thorax using a piece of Velcro.


Tying tips
- This can be a tricky fly to tie, but when done correctly it is one of Davie Wotton’s most attractive and effective caddis patterns.
- Proportion is paramount with this fly, so make sure the abdomen stops opposite the hook point and leave plenty of space at the eye to finish the fly.
- Colouring the Mylar rib is optional but I think the contrast in colour makes it worthwhile.
- Keep the dubbing sparce for the abdomen and gradually increase the dubbing as you reach the hook point.
- Ensure the pheasant tail thorax cover is tied in evenly but well spread, as this helps to create good separation in the deer hair wing.
- The original pattern used brown or grey partridge neck feather fibres instead of Summer Duck fibres for the legs, so use whichever you prefer.
- I find it easier to dub the thorax from the eye back to the wing and wind the thread back through the dubbing to the eye. This makes the dubbing more secure and helps prevent the dubbing from slipping forward over the hook eye.
- The addition of horns is optional, but I think it adds to the overall impression of a hatching caddis fly. When the butt ends are folded back and tied down securely, the neatest way to remove the waste fibres is to keep the thread tight and simply pull the butt ends off.
- If this pattern is tied with a slightly longer wing it makes a good egg laying caddis fly.
Fishing hints
I fish this pattern as a single fly on a tapered leader and a floating line. I Gink the deer hair wings and fish it either with a slow twitch or longish pulls adjacent to the lilies or close to bankside vegetation. Takes can be quite explosive affairs, so it pays to up the
Recent Comments