Fly of the month July by Les Lockey
Fly of the Month – July by Les Lockey
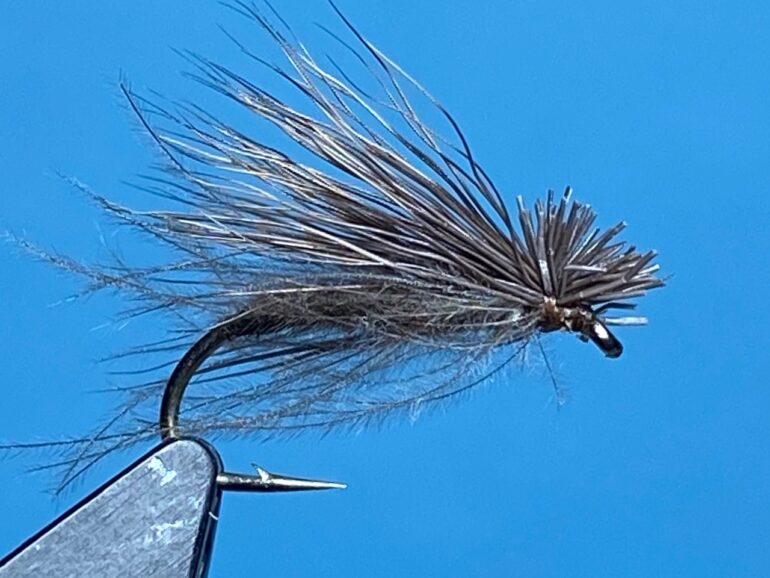
The CDC and Elk (Dry Fly)
Hook: Kamasan B170, or similar, in sizes 12 to 16.
Thread: Uni 8/0, in Camel.
Body and Legs: Small to medium natural CDC feather.
Wing: Coastal deer hair.
TYING
Photo 1. Secure the hook in the vice and starting at the eye, wind on a bed of thread to a point opposite the barb and remove the waste thread.
Photo 2. Take a CDC feather, stroke the fibres towards the tip and with well waxed thread, tie in the feather by the tip.
Photo 3. Bind down the tip of the CDC fibres with thread and continue to wind the thread in touching turns to just before the eye.
Photo 4. Keeping the CDC feather flat and untwisted, carefully wind it up the shank forming a CDC herl body. As the feather passes the mid-point of the shank, the longer feather fibers will begin to flair outwards, but continue to wind the feather like a hackle, stroking back the longer fibres after each turn until the eye is reached. Secure the feather with thread and remove the waste feather stem.
Photo 5. Cut away a small bunch of coastal deer hair from the skin, remove the underfur and align the tips in a hair stacker. Carefully remove the aligned hair from the stacker, gauge the bunch for length against the hook allowing for a small stub of hair at the head, and squarely trim the butt ends of hair to length. Using well waxed thread, and with the stub ends level with the front of the hook eye, tie in the hair as a wing with two overlapping thread turns. Make a third turn angled at about 45 degrees through the middle of the flared hair stub and make the next thread turn onto the hook shank directly under and in front of the hair.
Photo 6. Carefully form a neat head under the hair stub, apply some varnish to the thread, whip finish through it and remove the thread. If necessary, pinch any overly long straggly CDC fibres to length, to complete the fly.


Tying Tips
- This is a fairly straightforward fly to tie, although selecting a suitably sized CDC feather for any given hook size and tying in the deer hair wing correctly can be a little tricky at first. If the CDC feather is too small, it will not reach the hook eye and if it is too large, there will be no space for the legs, so a bit of trial and error might initially be required. Start with a small feather about an inch long and take it from there.
- Try to select a CDC feather without any broken barbs as this will maximise the fibres at the tip, which in turn helps to secure the feather to the shank. It will also avoid loose fibres forming in the wrong part of the body. I also like to remove the extra-long fibres from the base of the feather which makes for a neater finish at the head.
- A simple way to align the CDC fibres is to hold the base of the feather stem at the tie in point and make one lightly tensioned turn of thread over the stem, then gently pull the feather rearward until just the very tips of the feather are exposed, at which point the fibre tips can be secured with well waxed thread.
- I use fine hackle pliers to wind the feather up the shank, but keep the feather kept flat and untwisted. The longer loose barbs that were not tied in at the tip will become evident from about halfway up the shank, but just continue to wind the feather as you would a hackle, carefully stroking back the fibres after each turn, before tying down at the eye.
- As the name suggests, Elk Hair was originally used for the wing, but I much prefer fine coastal deer hair, particularly on smaller flies.
- Always cut away the deer hair from as close to the skin as possible. This keeps the skin free of lumps and bumps which makes cutting further bunches much more straightforward.
- Keep the bunch of deer hair relatively slim. Twice the thickness of a pencil lead is about right.
- To allow the deer hair to stack and align the tips correctly, it is important to remove any underfur and broken ends from the bunch, prior to putting the hair in the stacker. This can be done using your fingers, but I find it better to comb out the unwanted fibres with a fine nit comb. After stacking, remove the hair from the stacker and gauge for length against the hook shank allowing for a stub head equal in length to the hook eye and with the wing not much longer than the hook bend. Now while holding the deer hair in position ready for tying in, trim off the excess hair level with the end of the hook eye.
- Just three turns of well waxed thread are all that is required to secure the deer hair wing. The first two thread turns secures the bunch of hair in position, while the third angled turn made through the flared head fibres, helps anchor the hair to the shank. To start the process, hold the bunch of hair tightly between finger and thumb on top of the shank with the cut stub ends level with the end of the eye and take one loose thread turn over the hair but only tighten the thread as the thread loop is pulled vertically up, rather like making an upward pinch and loop, then repeat the process with a second turn of thread. The third turn of thread is angled through the flared head fibres with further thread turns being made onto the shank under the flared head and behind the hook eye. This technique helps to keep the wing on top of the shank and allows the formation of a neat, flared head.
- If required, the colour of the CDC feather and the deer hair can be matched to the hatch, but the natural colours used here have served me well enough that I don’t bother changing colours.
Fishing hints
- This pattern is a top quality dry sedge imitation that can be used whenever sedges are on the water. It performs best for me during June and July, when it is invariably my first choice dry sedge pattern and it very rarely lets me down.
- When targeting rising fish, I fish the pattern as a single fly on a tapered leader to aid presentation.
- The fly can be fished either static or twitched, but it also works well when given short pulls to make it skate on the surface. Each day is different, so it pays to ring the changes to find out what the trout prefer.
- When used as a pulling fly, I apply Gink to the flared head which allows the fly to pop back to the surface – an action that trout often find hard to resist.
Recent Comments