A Fly to Tie & Try June 2023 by Les Lockey
Fly of the month June by Les Lockey
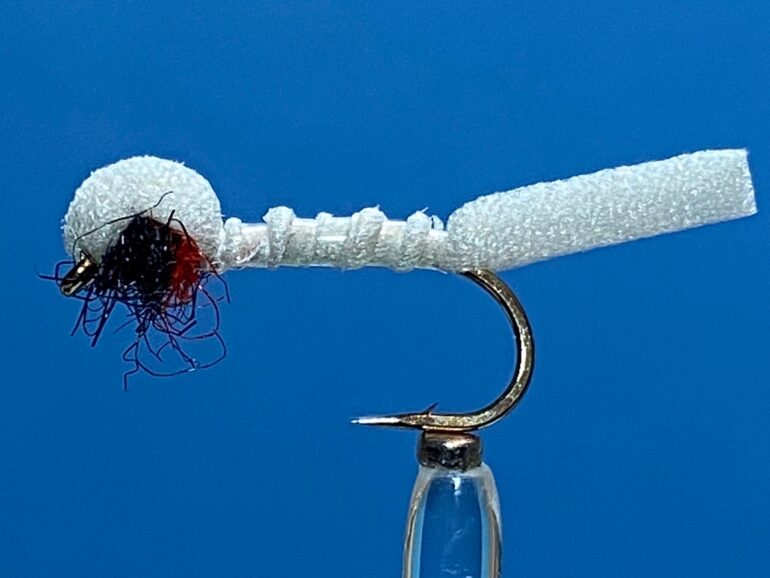
The Foam Hatching Buzzer
Hook: Kamasan B400, light wire hook, or similar, in sizes 12 to 16.
Thread: White Semperfli Nanosilk, 30D, or any very fine white thread.
1st Rib: Tag end of white thread.
2nd Rib: Clear UNI mylar, size 14 – 16.
Underbody: Mirage pearl tinsel, medium.
Thorax: Black with a touch of red seal’s fur at the rear.
Shuck, Abdomen & Thorax cover: Grey 3.5mm Plastazote foam cylinder, cut in half lengthways.
TYING
Photo 1. Secure the hook in the vice, and leaving a long thread tag, wind on a bed of thread from the eye to just before the bend. Do not remove the thread tag as this will be used later as a rib.
Photo 2. Tie in a length of clear mylar with the waste end the same length as the abdomen. In similar fashion, tie in a length of Mirage tinsel and bind down both waste ends with thread, leaving the thread at the thorax position.
Photo 3. Wind the Mirage tinsel up the shank in slightly overlapping turns and tie it down at the thorax. Remove the excess tinsel and take the thread to the hook eye.
Photo 4. Cut a 3.5 mm foam cylinder in half, lengthways. Take one of the halves and with the flat, cut side uppermost, tie it down immediately behind the eye, leaving the foam over the eye. Tidy the thorax area with more thread wraps leaving the thread at the eye.
Photo 5. Use a black felt pen to colour about 2-3cm. of thread, then tightly dub a pinch of black seal’s fur onto the coloured thread followed by a tiny pinch of red seal’s fur at the bottom of the dubbing noodle. Working from the eye towards the bend, wind on the dubbing as a thorax, leaving the thread at the rear of the thorax.
Photo 6. Bring the foam lightly back over the top of the thorax and tie it down at the rear of the thorax with just two thread wraps.
Photo 7. While holding the end of the foam on top of the hook shank, secure the foam centrally over the Mirage tinsel underbody using the thread tag as a rib. Tie the thread rib down at the thorax, again with just two turns of waxed thread and remove the waste thread tag.
Photo 8. In similar fashion, bring the clear Mylar up the body in the same spiral as the thread rib and tie it down at the thorax with two more turns of waxed thread. Remove the waste Mylar.
Photo 9. Apply some varnish to the thread and make a three turn whip finish through it at the rear of the thorax and remove the thread. Trim the tail/shuck to a narrow V shape and lightly brush out some of the seal’s fur thorax to complete the fly.
Photo 10. When viewed from below, the Mirage underbody should just shine through the gaps in the foam, creating the illusion of a transparent shuck.
Tying Tips
- This pattern tries to create the moment when the insect first begins to emerge from its diffused, semi-transparent shuck, so the dressing should be as light as possible and only tied on light wire hooks. Use the thinnest thread possible and keep thread turns to an absolute minimum to avoid any unsightly build-up of thread at the rear of the thorax. Veevus 16/0 or Sheer 14/0 are reasonable alternatives to the Nanosilk 30D used here.
- Although the foam appears almost white in the photos, it is in fact pale grey which is more in keeping with the colour of the natural shuck. However, grey Plastazote foam cylinders are difficult to find, although I believe grey Plastazote foam is now available from Upavon Flytying. I cut my own from blocks of heron grey Plastazote foam which I obtained many years ago from Ian Christie at Flybox. If grey foam is not available, use white and darken it down slightly with a waterproof black felt pen.
- When winding on the seal’s fur dubbing, try to keep it as tight as possible. This will avoid straggly fibres getting trapped when tying down the thorax cover. After the tying is complete, the seal’s fur can be lightly teased out with a piece of Velcro.
- Don’t be tempted to pull the foam thorax cover tight, as this will only reduce the fly’s buoyancy.
- This is not a hugely robust fly, but it can be made more durable by smearing the underside of the mylar rib with superglue before winding on the rib.
- The colour of the seal’s fur thorax can be changed to match the colour of the hatching insects. Other good colours are orange, olive, and fluorescent green which in small sizes, is a useful option when the notorious apple green midge are hatching off.
Fishing notes
- This is an unusual looking fly, which I tie in a rather unorthodox manner, but don’t be fooled; this is a very effective hatching midge pattern, which is particularly effective in calm conditions and when other more usual offerings have been rejected. However, even in calm conditions, I always smear a light coating of Gink on top of the foam thorax cover and shuck to aid floatation. To do this and help minimize contaminating other surfaces, I squeeze a small drop of Gink onto the back of my left hand and with the tip of my right small finger, I transfer the Gink from the back of my hand onto the specific parts of the fly.
- I first became acquainted with the original version of this fly over 30 years ago while fishing the North end of the loch. It was a lovely June evening and fish were rising everywhere, randomly sipping down unseen morsels from the water’s surface, and while I thrashed the water to a foam, casting to every rising fish in range, an angler sat quietly in the only other boat on the water, and with almost metronomic regularity proceeded to catch fish after fish. Back at the boathouse as we packed away our gear, I congratulated the successful angler and asked what fly he had been using, and in true Coldingham Loch spirit, not only did he very kindly give me the successful fly, but he also took the time to explain what the fly represented, how it was tied and perhaps most importantly, how best to fish the pattern. I learned a great deal that evening, and it is no exaggeration to say that this fly, together with the generosity, kindness, and enthusiasm of a fellow angler, totally transformed my whole approach to fly fishing. The following day, it transpired that the benevolent angler from the previous evening was none other than Scottish International and Borders angling legend, Ronnie Glass. Thank you, Ronnie. I will be forever in your debt.
- The pattern has stood the test of time, as just a couple of years ago, during a Fly Dressers Guild inter branch fishing competition, an olive version of the fly won me the competition with a total of 22 fish, while in second place, my closest challenger managed just 4.
- If fine wire hooks and fine tippets are to remain intact after encountering feisty Coldingham Loch trout, a light rod with a soft tip is hugely beneficial.


Recent Comments