A Fly to Tie & Try May 2022 by Les Lockey
Fly of the Month – May
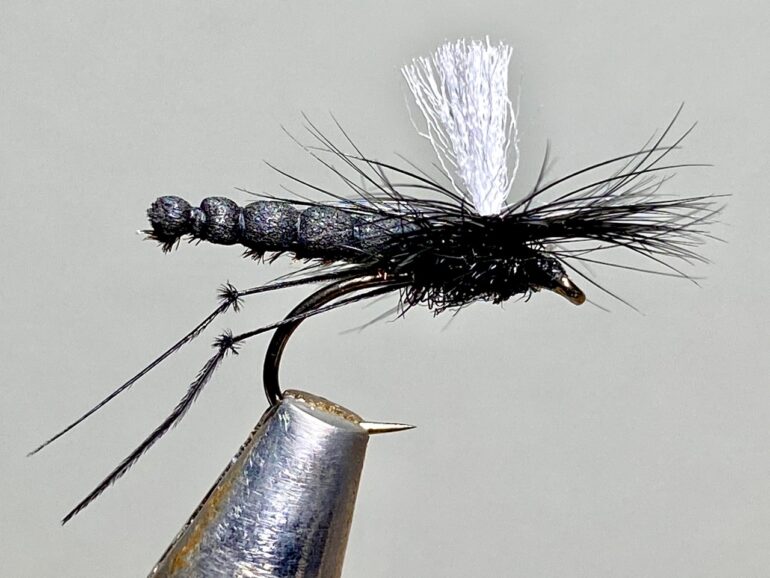
Detached Bodied Parachute Hawthorn
Hook: Kamasan B160 short shank, size 12.
Thread: Fine black thread, eg. Veevus or Sheer 14/0 or similar.
Detached Body: 1/16” diameter, black foam cylinder and two strands of bronze peacock herl.
Legs: 2 Single black pheasant tail fibres, knotted once.
Wing Post: Aero Dry Wing, White.
Hackle: Black cock saddle.
Thorax: Black seal’s fur, dubbed.
TYING
Photo 1. For the detached body, start by securing a fine sewing needle in the vice. Now wax a 3 inch tag end of thread and wind on 3 or 4 turns of thread as close to the needle point as possible. Do not cut off the thread tag as this will be used later to tighten the construct and also to help secure the body to the hook. Pinch off one end of the foam cylinder.
Photo 2. Impale the pinched end of the cylinder onto the point of the needle and secure it in place with 2 or 3 overlapping turns of thread.
At the same point, but under the needle, tie in 2 strands of peacock herl using no more than 2 more turns of thread. This forms the first segment of the body.
Photo 3. To form the next body segment, lift up the foam, peacock herl and thread tag and wind on 2 or 3 open turns of thread moving down the needle for about 2mm. then ensuring the herl is under the foam, secure all the materials onto the needle with 2 more thread turns.
Photo 4. Repeat this process, increasing the size of the segments as you move down the needle until 5 or 6 segments have been completed, then whip finish, and leaving thread and herl tags of about 4cm. in length, cut off the excess. Gently but firmly push the foam body off the needle. Tighten the construct by holding the body while gently pulling both tag ends of thread and set aside for later.
Photo 5. To tie the fly, remove the needle from the vice and clamp in the hook. Run on a bed of thread from the eye to opposite the hook point and remove the waste thread. Tie in the 2 knotted pheasant tail legs, one on either side of the shank. Bind down the fibre ends and remove the excess, leaving the thread at the mid-point.
Photo 6. Tie in centrally a length of Aero Dry Wing on top of the shank, and while gently pulling both ends upwards, take a couple of horizontal locking thread turns around its base, immediately above the hook shank.
Photo 7. Strip away the fluffy fibres from the bottom of the saddle hackle and trim the bare stem to about 3-4 mm in length. Using well waxed thread, tie in the hackle stem at the base of the wing post leaving about 2 mm of bare stem above the shank. Carefully wind the thread around both the base of the wing post and the bare hackle stem, ensuring each subsequent thread turn winds upwards until the bare hackle stem is covered, then return the thread back down the post to the shank and leave at the rear of the wing post. This is called “posting the hackle” which basically creates a support so the parachute hackle can be wound horizontally down the post.
Photo 8. Take the foam body construct and with the herl on the underside, securely tie it in behind the wing post and remove the excess foam. Bring the herl and thread tags in front of the wing post and tie them down securely with a few tight thread wraps, then remove the waste herl and thread tags. Return the thread to the rear of the wing post.
Photo 9. Dub a pinch of seal’s fur onto the thread and wind the dubbing over the cut foam and in front of the wing post to form the thorax.
Photo 10. Carefully wind the hackle horizontally down the support post, ensuring each turn is wound directly beneath the previous turn, then carefully secure the hackle at the eye with a few tight thread wraps.
Photo 11. Remove the excess hackle and while stroking the hackle fibres back from the eye, form a neat head. Add a drop of varnish to the thread and whip finish through it, then remove the thread. Manipulate the hackle fibres back to their correct position and trim the wing post to length to complete the fly.


Tying Tips
- This is quite a lengthy tying process, as the detached body must be constructed first before the fly can be completed but catch results have proved the effort is very well worthwhile.
- I find it best to make the detached foam bodies in batches. This not only speeds up the tying process, but it also means I have a stock of bodies ready to use whenever the need arises.
- strips of foam can be used as an alternative to the foam cylinders, although cylinders do produce more natural looking bodies. Pinching off the end of the cylinder continues this theme.
- A fine round tying thread is best for the formation of the foam bodies, as it maximises the segmentation effect in the body.
- In order to keep the finished fly in proportion, the foam body should be about 12 – 14 mm long from tip to whip finish point.
- Cock saddle hackles produce much neater parachute hackles, and their extra overall length allows them to be easily wound by hand without the need for hackle pliers. About 5 or 6 hackle turns is about right, although this will depend on the quality of hackle used.
- When tying in parachute hackles, it is generally accepted that the good shiny side of the feather should be facing the tier, as this results in the fibres pointing slightly upwards, making it easier to wind the next turn of hackle underneath. However, I prefer the hackle to be tied in with the dull underside facing the tier, which results in the fibres pointing slightly downwards. This requires more care when winding the hackle to avoid trapping the fibres as you wind the hackle down the post, but I am convinced that downward pointing hackle fibres produce a more realistic footprint on the water surface, and as a result, makes the fly even more effective.
- It can be helpful to hold the wing taught in a gallows tool when winding parachute hackles as this frees up both hands to rotate the hackle around the wing post, but with a little practice, hackles can be wound without this attachment. In this case, hackle tension is key to success. Winding the hackle clockwise, the away turns need to be under light tension, then while holding the wing taught, the hackle is returned under greater tension. In essence, only increase tension when the wing post is being held taught. Applying tension while the wing is unsupported will cause the wing to collapse and the hackle turns to slip off the wing.
- After the parachute hackle has been formed and tied down, I carefully separate the 2 wing post strands and add a small drop of thin varnish to their base which ensures the hackle will not slip off the wing post.
- Trim the wing to your preferred length. A long wing makes spotting the fly easier, while a short one gives better presentation. I usually leave the wing quite long and trim it on the day to suit the prevailing conditions.
- To prolong floatation, I brush the hackle and wing post with liquid silicone and allow to dry thoroughly overnight, before transferring the flies to my box.
- This pattern can be easily adapted to make an excellent Heather Fly imitation to be fished later in the season. Simply change the colour of the legs and the rear part of the thorax from black to red.
Fishing Hints
- The Hawthorn Fly, Bibio marci, also known as St. Mark’s fly, because they first appear around 25th April (St. Mark’s Day), is the largest of the British Bibionidae family, reaching about 15mm in length. They emerge synchronously in early spring producing an abundant, but relatively short- lived bounty for hungry trout. Curiously, it is only the males, with their distinctive trailing legs, that form the conspicuous flying swarms usually seen around flowering shrubs and hedgerows. However they are not strong fliers and are easily blown onto the water, invariably creating the first major fall of terrestrial flies in the stillwater fly fishing year.
- In calmer conditions, hawthorn activity becomes more localised, usually favouring areas of sheltered marginal vegetation warmed by the spring sunshine, so avoid cool shaded areas and look for rising fish taking the stragglers, often just inches from overhanging trees, flowering gorse bushes or clumps of yellow flag iris.
- During large falls of hawthorns, it is sometimes suggested that just about any bushy black dry fly will work, but this pattern is by far the most consistently productive imitation I have ever used, and when falls of the natural are sparse, this pattern continues to be very effective.
- Black gnats, Bibio johannis, and hawthorn flies are often on the water at the same time, so I like to fish the detached bodied hawthorn on the point of a two fly dry rig with a Summer Bibio on the dropper. Rises to hawthorn flies are usually confident and sometimes splashy affairs and as such, they are easy to detect, but takes to the Bibio tend to be gentle and much less obvious.
- The Heather fly, Bibio pomonae, as the name suggests, is a fly of uplands and moorlands and as such, would be an unlikely visitor to Coldingham Loch, but during August and early September, it is still well worth giving it a try.
Recent Comments