A Fly to Tie and Try this month – August 2021
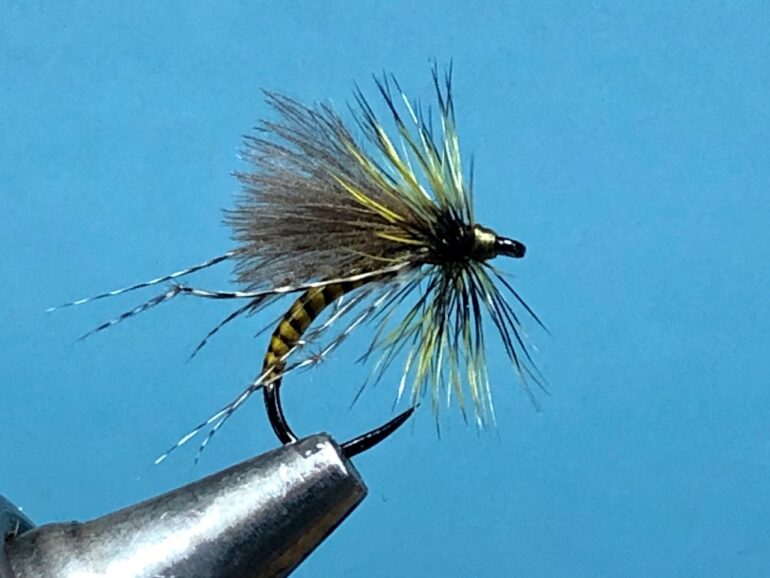
The Olive Hopper
Hook: Lightweight grub or Fulling Mill Czech nymph hook, size 16.
Thread: Olive Semperfli Nanosilk, 50D, or any olive fine flat thread.
Body: Dyed olive stripped peacock eye quill coated with UV resin.
Legs: Six bronze mallard feather fibres, knotted twice.
Wing: Tips of 2 or 3 small CDC feathers.
Hackle: Olive grizzle cock hackle.
TYING
Photo 1. With the hook secure in the vice, wind on a bed of thread to part way round the hook bend and remove the waste thread.
Photo 2. Tie in the narrow end of a stripped peacock eye quill and in touching turns, bind down the waste end with thread to form a smooth underbody.
Photo 3. Carefully wind the quill in touching turns to the thorax, secure with thread and remove the excess quill. Spread a small drop of UV resin over the entire quill body and cure with a UV torch.
Photo 4. Tie in 3 knotted bronze mallard fibre legs either side of the hook shank and slightly past the hook bend, then remove the excess fibres.
Photo 5. Align the tips of 2 or 3 small CDC feathers and tie them in on top of the shank with the tips pointing rearwards. Remove the excess feather stalks and bind them down with a few thread wraps. The wing length should be slightly more than half the length of the abdomen.
Photo 6. Tie in a short fibred cock hackle by its stalk in front of the wing.
Photo 7. Make 2 turns of hackle in front of the wing and secure with thread. Remove the excess hackle, tidy the head, whip finish, and remove the thread. Varnish the head to complete the fly.
Tying Tips
- Despite its name, this pattern is essentially a scaled down version of a quill – bodied emerging buzzer, but with the novel addition of knotted bronze mallard fibres acting as hopper legs, which are surprisingly robust and help maintain the proportions of the fly.
- A flat tying thread makes it easier to produce a smooth underbody on which to wind the stripped quill.
- To ensure the thread remains flat during this process, spin the bobbin holder anticlockwise.
- Over time, peacock eye quills can become brittle, so to keep them as supple as possible, I soak them for 10 minutes before use in a mixture of warm water and a drop or two of fabric conditioner. Synthetic quills are a more user – friendly alternative, but they are often too wide for small hook sizes.
- I find it easier to make the first turn of peacock quill by hand, and then catch the quill in a good pair of hackle pliers before continuing to wind the quill up the shank.
- UV resin helps protect the fragile quill body but use it sparingly. A small drop goes a long way. My preferred UV resin for quill bodies is Solarez Bone Dry (from Funky Flytying) which is a very thin, low viscosity resin, that cures quickly to a bone dry finish and comes with its own fine pointed brush for precise application. It does, however, crystalize when cold, which is normal for this resin, but 15 seconds in the microwave will return it to its useable state.
- As an alternative to resin, the quill can be wound over wet varnish or superglue, in which case, the glue or varnish needs to dry thoroughly before completing the dressing.
- Knotted pheasant tail fibres are too coarse for a fly of this size, so I use knotted bronze mallard fibres. Unfortunately, these are not available from retailers, so you will have to knot your own. I create the knots using a pair of very fine watchmaker’s forceps and although the process is somewhat tedious, it is relatively straightforward and the results make the effort worthwhile.
- To prepare the hackle, I pull off all the fluffy fibres from the bottom of the feather to expose the stem and then trim the stem to about 1mm. in length, and with the good side of the feather facing forward over the hook eye, I tie in the cut stem with 2 or 3 secure turns of well waxed thread. Well waxed thread is essential, as it not only provides security with minimal turns of thread, but it also avoids thread build up allowing the formation of a neat head.
Fishing notes
- There can be few more frustrating and challenging scenarios for the stillwater fly angler than being afloat in a flat calm, while surrounded by rising trout randomly sipping down seemingly unseen morsels from the surface. The absence of a helpful wind to turn your flies over cleanly and a corresponding lack of a convenient ripple to camouflage a leader that stubbornly refuses to sink, means all the advantages lie with the trout and they will not be easily deceived. In these conditions, I find it is better to concentrate on presentation rather than distance and keep casts relatively short.
- My method with the olive hopper is to fish it as a single fly, tied to a tapered fluorocarbon leader with a 5lb. tippet, which I rub down with sinkant to remove any shine. I also deliberately make up the leader with numerous sections of fluorocarbon, as the weight of the additional knots helps to sink the leader. The fly is then cast out about 20 to 30 feet or so and any slack line is brought under control leaving the fly stationary for the fish to find.
- Takes are usually deliberate, but rather leisurely affairs, so give the fish time to turn down on the fly before trying to set the hook
- It takes a bit of nerve to dispense with the usual 2 or 3 fly set-up and place all your faith in just a single tiny dry fly, but in a flat calm, this undoubtedly produces the best presentation and gives the best chance of success.


Recent Comments