A Fly to Tie and Try – July by Les Lockey
Fly of the Month – July by Les Lockey
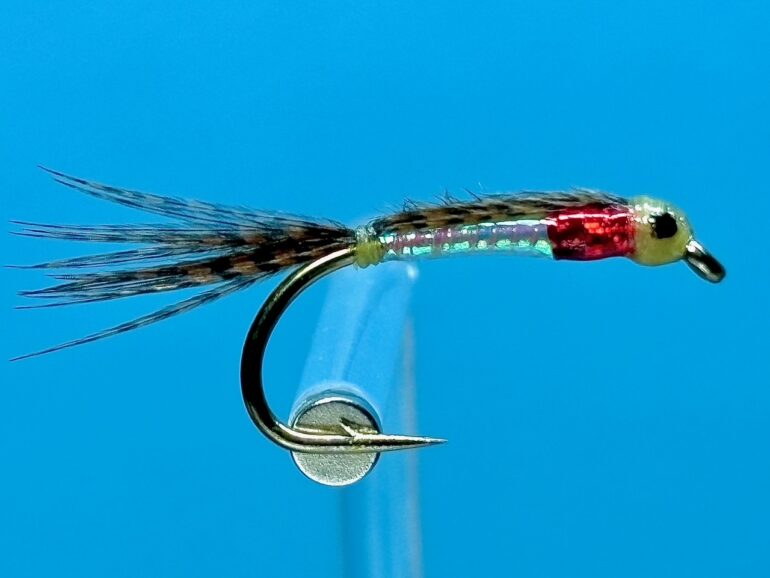
The Perfect Pinfry – (Steve Cullen)
Hook: Kamasan B175, sizes 10 or 12, or similar.
Thread: Uni 8/0, Lt. Cahill, or similar.
Tail and back: Section of well-marked bronze mallard fibres.
Body: Uni Mylar, Pearl, size 12, wound over varnish or superglue.
Thorax: Red holographic tinsel.
Eyes: Black varnish.
TYING
Photo 1. Secure the hook in the vice, and starting at the eye, wind on a short bed of thread, remove the waste thread and return the thread to the eye.
Photo 2. Select a section of well-marked bronze mallard fibres about 5-6mm. wide, align the tips and remove from the feather stem. Measure the fibres for length so the fibres reach from just before the hook bend to about a tails length in front of the eye. Move the gauged length to the eye and with the fibre tips pointing forward of the eye, tie them in securely on top of the shank. Using an angled cut, trim off the excess mallard fibres a thorax length back from the eye. Bind down the cut ends and continue the thread in touching turns to a point just before the barb of the hook.
Photo 3. Tie in a length of pearl Mylar and bind down the stub end with touching turns of thread, stopping at the thorax.
Photo 4. Lightly coat the thread wraps with vanish or superglue then wind the mylar in overlapping turns down the shank to the start of the thorax. Secure the Mylar with thread and remove the excess tinsel.
Photo 5. In similar fashion, tie in a length of red holographic tinsel leaving the thread at the eye. Wind the tinsel in overlapping turns up to the eye, then back to the tie in point and once more back to the eye. Secure with thread and remove the excess tinsel and whip finish.
Photo 6. Remove the thread and re-attach it at the end of the pearl mylar creating a small thread base then remove the waste thread.
Photo 7. Carefully fold back the bronze mallard fibres ensuring they are evenly spread on top of the body and tie them down at the bend with no more than 3 or 4 turns of thread. Whip finish and remove the thread.
Photo 8. Re-attach the thread at the eye and wind it over the front of the fly to form a reasonably full head. Whip finish and remove the thread.
Photo 9.Coat the head and the underside of the fly with varnish, paying particular attention to the tail tie in area, and leave to dry thoroughly.
When dry, use a cocktail stick or the head of a small pin to add a dab of black varnish on each side of the head to form the eyes and leave to dry. An additional coat of clear varnish or UV resin over the whole head improves durability and completes the fly.


Tying Tips
- This is a simple, if somewhat time consuming fly to tie, as the thread needs to be removed and re-attached several times and the varnish needs to dry thoroughly before adding the eyes, so it is a good idea to tie them in batches.
- When manipulating the bronze mallard fibres, I find it best to first isolate a suitable section of feather and align the tips while still connected to the feather stem, then while holding the aligned tips tightly, pull the fibres away from the stem. This will help keep the fibres together and make it easier to tie in the fibres and produce a small, neat tie in point just behind the eye.
- It is important to get the length of the bronze mallard fibres correct before finally securing the fibres at the hook eye. To gauge the correct length, hold the mallard fibres at the hook bend with the tips pointing out over the eye and adjust the length so that the tips protrude about half the length of the shank in front of the eye. At that point, move the bunch of fibres forward and tie them in behind the hook eye with a couple of turns of thread. The fibres can then be carefully folded back to check the length is correct before finally securing the fibres with more turns of thread.
- Always cut away the butt ends of the bronze mallard fibres at an angle which will help produce a tapered fish like underbody.
- When folding back the bronze mallard fibres, ensure the fibres lie evenly on top of the hook and do not slide down the sides, before securing at the bend.
- To produce a fly with more of a neutral density, try tying in a sliver of brown foam on top of the body before folding back the mallard fibres.
Fishing Hints
- As you would expect, this fly is best fished from June through to August when shoals of pin fry are present.
- It can be fished like a straight lined nymph, or with short pulls and long pauses, but for a more controlled and almost static presentation, try fishing it on a washing line and allow it to drift around on the wind. This is also a good approach when fishing over submerged weed beds and around structure where fry often congregate.
Recent Comments