April 2023 A Fly to Tie & Try by Les Lockey
The Twisted F.A.B. (Foam Assisted Blob)
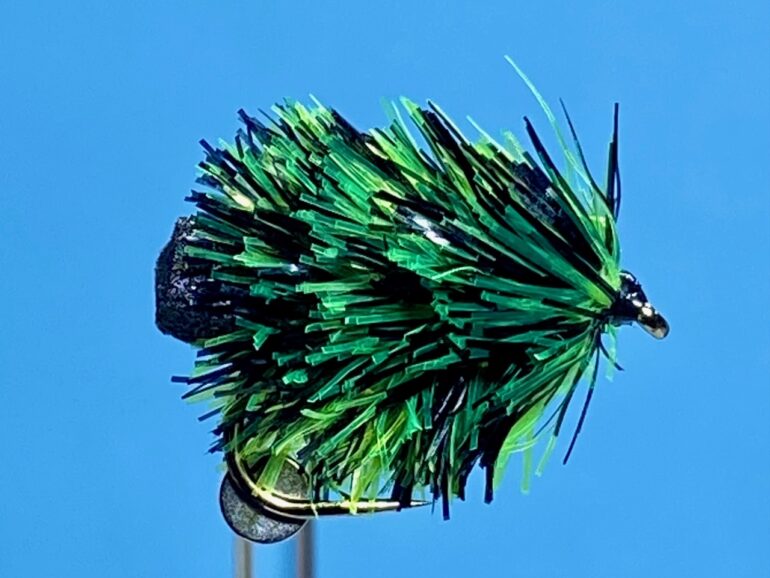
Hook: Kamasan B160, short shank hook, size 8 or 10.
Thread: Black Veevus GSP, 50D.
Tail: Black foam cylinder, 5 or 6mm. in diameter.
Body: Any fine cored Fritz in black and fl. green, such as, Definite Advantage 15mm. translucent Fritz from Dave Downie at flyfishingworld.com or FNF 10mm. Jelly Fritz from fnflyfishing.co.uk
TYING
Photo 1. With the hook secured in the vice, wind on a bed of thread from the eye to a point opposite the barb and remove the waste thread. Prepare the foam by taking a 5 or 6 mm. black cylinder and cutting it in half. Take one of the halves and cut it in half along its long axis, producing two useable foam “tails”.
Photo 2. Lightly smear some superglue along the thread base, position one of the foam “tails” flat side down on top of the shank with the tail section proud of the hook bend. Press the foam against the shank and secure in position with the thread. Continue to bind down the foam to form as even an underbody as possible and return the thread to the barb.
Photo 3. Take 12cm.lengths of black and green Fritz and strip away the flue from one end of each length to expose the cores. Tie in the cores flush against the foam “tail” and bind them down with thread, leaving the thread at the eye.
Photo 4. Twist the two lengths of Fritz together to form a twisted Fritz rope, occasionally pulling the strands away from each other to tighten the twists and push them closer to the shank.
Photo 5. Keeping hold of the twisted Fritz, wind the twisted Fritz rope up the shank to just before the eye. Hold the Fritz body in position and allow the remaining Fritz to untwist, then secure the Fritz with a couple of tight turns of thread and bring the thread to immediately behind the hook eye.
Photo 6. Once secured, gently pull the two strands rearward. At the same time, wind the thread back from the eye to lock the two lengths of Fritz in position, creating a neat head in the process. Carefully remove the excess fritz with a sharp blade.
Photo 7. Whip finish, remove the thread and varnish the head and if required, trim the foam “tail” to length to complete the fly.
Tying Tips
- FABs and blobs tend to polarise fly fishing opinion. However, the FAB has been instrumental in the development of the highly effective washing line technique and in so doing, has actually popularised the use of more traditional nymphal patterns, so for this reason as well as its rather unusual tying method, which quite literally has a bit of a twist, I feel its inclusion here is justified.
- A flat tying thread helps to tie down the foam and even out the bumps, but when tying down the Fritz at the head, spin the bobbin clockwise to tighten the thread into a thin and tight rope which makes for a more compact tie in point and a neater head.
- Add a small drop of superglue to the thread base before firmly securing the foam with thread. This will prevent the foam from sliding around the hook shank and provide a solid foundation on which to wind the fritz. Some tiers cut the foam “tail” centrally to increase its surface area, which supposedly increases the fly’s buoyancy, but I have never found this to be necessary.
- If foam cylinders are not available, simply cut a 5mm. wide strip of 2mm. thick black craft foam, double it over the hook bend to form a foam loop “tail” and with the foam running down either side of the shank, bind it down securely with thread.
- While the weight of the hook and the amount of foam used would seem to dictate the buoyancy of the fly, it is important to realise that when fishing the washing line, over and above the buoyancy of the FAB, the type of leader material used, length of leader, distribution of droppers on the leader, the weight of the dropper flies, and the prevailing weather conditions, will all have an impact on the depth at which the flies will fish, so it is worth tying up FABs with differing amounts of foam so you can adjust the buoyancy of the set up as required.
- There are literally dozens of different kinds of Fritz on the market today and in a vast array of colours, including a few dual coloured options, but these are largely limited to mixes of yellow, green, orange, and pink, however by using fine cored, unboosted Fritz, the variety of different colour combinations is almost endless.
- When twisting the strands of Fritz together, remember to occasionally pull the strands away from each other. This tightens the twists, allowing the fibres to mix evenly and it pushes the twists further up the core towards the shank. Approximately 10 cm. of twisted Fritz will be required, and it is surprising just how many twists that will take. Once the Fritz is twisted together, give it a gentle brush to ensure the fibres are well mixed and remember to keep hold of the twisted Fritz throughout the winding process to prevent the twists unravelling.
- A quicker and simpler way of twisting the Fritz together is to use the new dubbing twister from Smhaen of Denmark. This clever little tool is primarily concerned with making and controlling dubbing loops, but it can also be used to directly clamp and spin many different kinds of material, including Fritz.
- Once the Fritz body is wound along the shank, use your left thumb to hold the Fritz in position. The remaining Fritz can then be untwisted and secured with thread. It helps here to spin the bobbin clockwise to twist the flat thread into a fine round thread and wax it well before tying down the Fritz. Once secure, and with the thread taken to the eye, the untwisted strands of Fritz are gently pulled rearward while the thread is wound back from the eye. This locks the Fritz in place, pushes the front fibres rearward and forms a neat head all at the same time.
- Use a sharp blade such as a razor, scalpel, or craft knife, to cut away the Fritz.
- To change the fly from a FAB to an early season blob, simply omit the foam. Some tyers like to add a short tail of black or fluorescent green marabou.
- Instead of twisting the two lengths of Fritz together, another option, although tricky to do, is to wind the two lengths of Fritz simultaneously, which produces bands of colour rather than an integrated mix of colours.
Fishing notes
- Love it or loathe it, there can be no doubt the FAB, perhaps more than any other fly pattern in recent times, has transformed modern stillwater fly fishing by being an integral part of the very successful washing line technique. The washing line is a term used to describe fishing a buoyant or neutral density point fly with nymphs, buzzers or cormorants hanging from the droppers allowing the flies to be fished slowly and to remain in the taking zone for as long as possible. Typically, this method is used in conjunction with floating, midge tip, or intermediate lines, particularly when the fish are in the top 6 feet of water, but it can be equally effective on faster sinking lines when fish are deeper in the water column.
- The FAB is often considered a sacrificial fly whose primary function is to keep the dropper flies at a particular depth, but on many occasions, FABs will take more than their fair share of fish, especially rainbows.
- FABs can be used at any time of year, although this black and green version is best either early or late in the season.
- On one memorable occasion, I was told the fish were high in the water and taking buzzers fished on a washing line, which I duly set up. Drifting out of Swing Gate Bay I had an instant response as a fish grabbed the orange FAB on the point. After landing several more fish, all to the FAB, and with no interest at all in the buzzers, I removed the buzzers and the middle dropper and proceeded to fish two FABs for the rest of the day. This resulted in one of my best ever “dry fly” days on the loch. Just what the trout were taking the FABs for I have no idea, but I can’t wait for another hatch of FABs!


Recent Comments